Scripting and Computational GeometryCompiled by Stylianos Dritsas in Spring of 2003, reedited Summer
2004
|
0 |
1 |
2 |
3 |
4 |
5 |
6 |
7 |
8 |
|
Another example of a two dimensional array with 3 by 9 cells. Two dimensional arrays are also known as matrices. The same rules apply here, but beware of the dimensions: a three dimensional array would resemble a rectilinear box of cells and a four dimensional array is virtually impossible to be understood, maybe as a four-dimensional thingy (hyper-box, polychoron of cubes etc). Most of the times people use linear and planar arrays. so we will just stick to them.
0 |
1 |
2 |
3 |
4 |
5 |
6 |
7 |
8 |
|
0 |
|||||||||
1 |
|||||||||
2 |
Arrays are important because they allow to create groups of values, which by convention represent something more than primitive data. A point coordinates are represented as an array of three elements (x, y, z). The convention in this case is that the first element is "x", the second is "y" and the third is "z".
x |
y |
z |
|
1.25 |
3.23 |
-5.0 |
One way to create an array in vbscript is by using the redim keyword. Remember that you always enter the name of the array and the index number of the last element. Therefore the array contains (the last index + 1) elements since the numbering starts from zero. Another thing is that each element behaves as common variable, which means that each element when you first create an array will be empty but you can assign anything that you want in the same fashion as with plain variables.
      '' Declare a linear array with 9 elements
      ''
      redim arr( 8 )
      arr( 0 ) = 1
      arr( 1 ) = 2
      arr( 2 ) = 3
      arr( 3 ) = 5
      arr( 4 ) = 8
      arr( 5 ) = 13
      arr( 6 ) = 21
      arr( 7 ) = 34
      arr( 8 ) = 55
      arr( 9 ) = 89 '' Whoops out of bounds error!!!

      '' Declare a 2 by 2 matrix
      ''
      redim mat(  2, 2  )
      mat( 0, 0 ) = 1
      mat( 1, 0 ) = 0
      mat( 1, 1 ) = 1
      mat( 0, 1 ) = 0
So, in order to assign something in a cell you will have to use the "name of array + index number enclosed in parentheses" scheme.
ArrayName( IndexOfCell ) = Value
And in order to get the value from a specific cell, you will have to use the same scheme, but this time the array will have to appear on the right part of the assignment.
Variable = ArrayName( IndexOfCell )
Remarks:
An array may not be necessarily homogeneous (in the types of data that each element/cell contains) but homogeneity is usually preferred for avoiding confusions.
You can also use the dim keyword to declare an array but redim is usually preferred. If you want to know the reason then: a dim keyword/statement makes/defines/declares a static array, i.e. you cannot change the number of cells once the array is declared, whereas by using redim you can do this (if necessary) later on. So, because redim is more general it is better to be used in any case.
      '' Make a point
      ''
      redim point( 2 )
      point( 0 ) =  1.22
      point( 1 ) =  2.45
      point( 2 ) = -1.21

      '' Plot the point
      ''
      call rhino.addpoint( point )


      '' Request a point
      ''
      dim vertex: vertex = rhino.getpoint( "Pick a point" )

      '' Modify it / Translate it
      ''
      vertex( 0 ) = vertex( 0 ) + 1.22
      vertex( 1 ) = vertex( 1 ) + 2.45
      vertex( 2 ) = vertex( 2 ) - 1.21

      '' Make a line between the hard coded point
      '' and the modified point
      ''
      call rhino.addline( point, vertex )
Notice that is the second example of modifying a point that was grabbed from the viewport, the variable "vertex" was declared with dim rather than redim. This is a special case of dynamic arrays which you can create by using the array function. The array function just picks up the parameters and puts them in a linear array and gives them back.
      '' Make a point on the fly
      ''
      dim point
      point = array( 1.22, 2.45, -1.21 )

      '' Make an arbitrary array of numbers on the fly
      ''
      dim numbers
      numbers = array( 1.00, 0.45, -21, 3, 45, 66 )
This an easier way to make arrays as long as you know how many elements they will have. As mentioned before, an array can contain another array(s). You can make them by using the array function.
      '' Make a point on the fly
      ''
      dim points
      points = array( array( 1.22, 2.45, -1.21 ), array( 13.3, -12.3, 3.0 ), array( 53.3, 12.3, 35.0 ) )

      '' Draw a three point / two segments polyline
      ''
      call rhino.addpolyline( point )

      '' Draw a three control point curve
      ''
      call rhino.addcurve( point )
Multidimensional arrays and jagged arrays
Even though the semantic of an n-dimensional array and an array containing arrays are the same, the language doesn't treat them as equal. The following two arrays may look the same but they are of different kinds. The first one is called n-dimensional array, while the second is know as jagged.
      '' Make an array of two points
      ''
      redim points( 1, 2 )
      points( 0, 0 ) = 0.34
      points( 0, 1 ) = 4.0
      points( 0, 2 ) = 34.3

      points( 1, 0 ) = 1.3
      points( 1, 1 ) = 4.25
      points( 1, 2 ) = 123.33

      '' Make another array of two points
      ''
      dim points2: points2 = array( array( 0.34, 4.0, 34.3 ), array( 1.3, 4.25, 123.33 ) )

      '' Accessing the array's elements
      ''
      points2( 0 )( 0 ) = 0.34
      points2( 0 )( 1 ) = 4.0
      points2( 0 )( 2 ) = 34.3

      points2( 1 )( 0 ) = 1.3
      points2( 1 )( 1 ) = 4.25
      points2( 1 )( 2 ) = 123.33

      '' This is also legal
      ''
      points2( 0 ) = array( 0.34, 4.0, 34.3 )
n-dimensional mapping |
jagged mapping |
||||||||||||||||||||||||||||||||||||||||||||||||||||||||||||||
|
|
Geometry 101: Point Arithmetics
Now that you have a basic understanding of most data representations, and a glimpse of how things work in rhino, it is time for some basic geometric ideas which are independent of software and computer language. Because we are working with a specific programming language and a specific software though, the examples have to adapt to the local conditions. Since, rhino understands points as arrays with three real number elements we will make three convention variables which will help making the code a little bit more legible. I use capitals letters for naming variables that I will not change their value and furthermore they will remain global and constant through out this document.
It is important to understand that the whole geometrical construct that computers know how to do is based on the idea of the point: identity of position. If you know how to handle points, then you are able to handle everything else. For example lines, planes, meshes are all point constructs, NURBS too even though there is an indirection (control points). Modifying a higher level object always comes down to manipulating its points. So, here are the most basic yet important point arithmetics.
 |
 |
 |
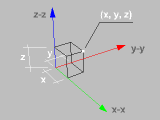 |
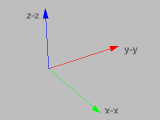
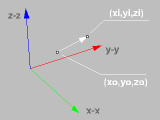
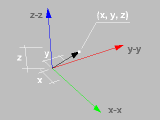
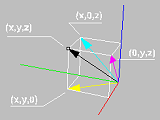
A global coordinate system defined by three axes |
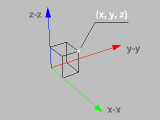
A point in space defined by coordinates |
Projection of point on planes defined by the axes |
The (x, y, z) coordinates represent the distance of the point per axis from the origin |
      '' Making a convention definition
      ''
      dim VERTEX_X: VERTEX_X = 0
      dim VERTEX_Y: VERTEX_Y = 1
      dim VERTEX_Z: VERTEX_Z = 2

      '' Make a point
      ''
      redim point( 2 )
      point( VERTEX_X ) =  1.22
      point( VERTEX_Y ) =  2.45
      point( VERTEX_Z ) = -1.21
Distance between points
The distance between points or length of the linear segment they define is given by the square root of their coordinate difference squared. You can think of it as the three dimensional version of the Pythagorean theorem.
      '' The distance between points / length of linear segment
      ''
      dim pa: pa = array( 2.00, -1.00, 3.00 )
      dim pb: pb = array( 5.00,  6.00, 1.00 )

      dim dx: dx = pb( VERTEX_X ) - pa( VERTEX_X )
      dim dy: dy = pb( VERTEX_Y ) - pa( VERTEX_Y )
      dim dz: dz = pb( VERTEX_Z ) - pa( VERTEX_Z )

      dim distance: distance = sqr( dx * dx + dy * dy + dz * dz )
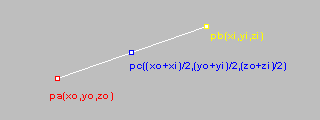
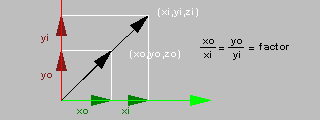
The mid points and centroids
Say you have two points pa(xo,yo,zo) and pb(xi,yi,zi). Then the
mid point is defined as the average of their coordinates. Moreover,
this is a general principle for point arithmetics. If you average
three points you get the centroid of the triangle they describe.
If you average an arbitrary amount of points then you get their
centroid (like the pivot point used for meshes).
 |
 |
The midpoint of two points |
The centroid of a triangle |
      '' The mid point
      ''
      dim pa: pa = array( 2.00, -1.00, 3.00 )
      dim pb: pb = array( 5.00,  6.00, 1.00 )

      redim midpoint( 2 )
      midpoint( VERTEX_X ) = ( pa( VERTEX_X ) + pb( VERTEX_X ) ) / 2.0
      midpoint( VERTEX_Y ) = ( pa( VERTEX_Y ) + pb( VERTEX_Y ) ) / 2.0
      midpoint( VERTEX_Z ) = ( pa( VERTEX_Z ) + pb( VERTEX_Z ) ) / 2.0

      '' Triangle's centroid
      ''
      dim pc: pc = array( 3.00,  9.00, 0.00 )

      redim centroid( 2 )
      centroid( VERTEX_X ) = ( pa( VERTEX_X ) + pb( VERTEX_X ) + pc( VERTEX_X ) ) / 3.0
      centroid( VERTEX_Y ) = ( pa( VERTEX_Y ) + pb( VERTEX_Y ) + pc( VERTEX_X ) ) / 3.0
      centroid( VERTEX_Z ) = ( pa( VERTEX_Z ) + pb( VERTEX_Z ) + pc( VERTEX_X ) ) / 3.0
Translation
Whenever you move some geometry from one place to the other, you
usually have to specify a starting and an ending point. The mathematical
expression for moving stuff around is translation. Translation can
be defined in multiple ways: distances per direction / axis, a starting
and an ending point, a vector. We are used to the second definition
because points are geometrically representable whereas directions
and vectors are a little bit more fuzzy. The easier way computationally
for implementing translation of a point/object in space is by summing
its coordinates (x, y, z) with distances per directions / axis (dx,
dy, dz). In the case of two points, we can subtract the coordinates
of the reference points (endpoint - startpoint) in order to get
the distances per direction and apply the previously described sum
of the coordinates. The last case of the vector is actually a generalization
of the previous. A vector is just the distances per axis between
two points (dx, dy, dz).
Now if we symbolize a translation as a function "t( )" of a point and we have two translations "t1" and "t2" and a point "p", then we can infer from the previous information that "t1( t2( p ) ) = t2( t1( p ) )", because "dx1 + dx2 + x = dx2 + dx1 + x" etc. In other words, the sequence that you apply translations if indifferent. You can also understand that "t + t-1 = 0", which means that if you move a point somewhere, and then move it back, then it is like you didn't move it at all.
 |
 |
 |
 |
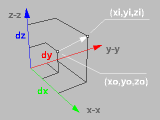
Two points define a translation; the order of points defines the direction |
The difference of their coordinates define the distances |
You may think a point's coordinates describing a translation of the origin(0, 0, 0) to (x, y, z) |
In this case you may think translation as a shift of the coordinate system to a new position |
      '' Translation by distances
      ''

      '' Make a point
      ''
      redim point( 2 )
      point( VERTEX_X ) = 1.44
      point( VERTEX_Y ) = 2.35
      point( VERTEX_Z ) = 3.87

      '' Setup the translation offsets per axis
      ''
      dim dx: dx = 4.62
      dim dy: dy = 5.09
      dim dz: dz = 6.37

      '' Translate the point
      ''
      point( VERTEX_X ) = point( VERTEX_X ) + dx
      point( VERTEX_Y ) = point( VERTEX_X ) + dy
      point( VERTEX_Z ) = point( VERTEX_X ) + dz

      '' Translation by two points
      ''

      dim s_point: s_point = array( 1.10, 2.34, 3.72 )   '' start point
      dim e_point: e_point = array( 3.44, 5.90, 6.89 )   '' end point
      dim   point:   point = array( 7.55, 8.77, 9.37 )   '' the point to move

      '' Calculate the distances
      ''
      dim dx: dx = e_point( VERTEX_X ) - s_point( VERTEX_X )
      dim dy: dy = e_point( VERTEX_Y ) - s_point( VERTEX_Y )
      dim dz: dz = e_point( VERTEX_Z ) - s_point( VERTEX_Z )

      '' Translate the point
      ''
      point( VERTEX_X ) = point( VERTEX_X ) + dx
      point( VERTEX_Y ) = point( VERTEX_Y ) + dy
      point( VERTEX_Z ) = point( VERTEX_Z ) + dz

      '' Translation by vector
      ''
      dim vector: vector = array( _                  '' Create the vector
        e_point( VERTEX_X ) - s_point( VERTEX_X ), _
        e_point( VERTEX_Y ) - s_point( VERTEX_Y ), _
        e_point( VERTEX_Z ) - s_point( VERTEX_Z )  _
      )

      dim point: point = array( 7.55, 8.77, 9.37 )   '' The point to move
      dim moved: moved = array( _                    '' Create the translated point
	    point( VERTEX_X ) + vector( VERTEX_X ), _
	    point( VERTEX_Y ) + vector( VERTEX_Y ), _
	    point( VERTEX_Z ) + vector( VERTEX_Z )  _
      )
Scaling
While scaling is as easy as translation, rotation is a bit complicated and I will skip it for now.
Scaling implies a multiplication (like 1:200 or 1/16'' scale of a model or plan).
For scaling you just have to multiply a points/objects coordinates by a scaling factor. If the factor
is same for all axes, then it is called uniform scaling, otherwise it is also known as non-uniform
scaling. Actually the commands scale1D and scale2D, just keep the scaling factor for two or one axes (respectively)
zero while allow the other(s) to change. Again, there are many ways to define a scaling action: by a single
factor, by reference length and new length, by reference points etc.
There is though a tricky part with scaling, which was implied in the translation transformation but it didn't affect the results. A scaling must be defined according to a point of reference. If you just multiply the (x,y,z) coordinates of a point with a scale factor (x * f, y * f, z * f), then you have to understand that you actually imply a scaling in reference to the origin point of the global coordinate system. When CAD software ask you for a reference point they translate the coordinate system to your point, they perform the scaling multiplication, and then move the coordinate system back in place (all these behind the scenes).
Again if we symbolize a scaling as a function "s( )" and we have a couple of them "s1" and "s2" and a point "p", then we can infer that "s1( s2( p ) ) = s2( s1( p ) )", because it all comes down to "f1 * f2 * coordinate = f2 * f1 * coordinate", where "f1" and "f2" are the scaling factors for "s1" and "s2", respectively. But if we have a point "p", a translation "t" and a scaling "s", then "t( s( p ) ) <> s( t( p ) )", that is the order of appling transformations is important.
 |
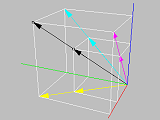 |
 |
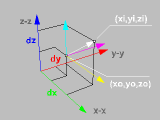
Projections of a point (and a vector) to the planes of the coordinate system. |
Scaling through the origin of the coordinate system. |
Scaling is calculated by a multiplication of the coordinates of a point by a scaling factor. |
      '' Scaling in reference to global coordinates
      ''
      dim point:   point   = array( 7.55, 8.77, 9.37 )   '' The point to scale
      dim scale_x: scale_x = 2.0                          '' The scaling factor for x axis
      dim scale_y: scale_y = 2.0                          '' The scaling factor for y axis
      dim scale_z: scale_z = 2.0                          '' The scaling factor for z axis

      point( VERTEX_X ) = point( VERTEX_X ) * scale_x      '' Scale the point: notice that
      point( VERTEX_Y ) = point( VERTEX_Y ) * scale_y      '' the scaling is uniform
      point( VERTEX_Z ) = point( VERTEX_Z ) * scale_z

      '' Scaling with reference point
      ''
      dim vertex: vertex = array( 7.55, 8.77, 9.37 )   '' The point to scale
      dim refpnt: refpnt = array( 1.00, 3.00, 6.00 )   '' The reference point

      '' Since we already know how to scale about the origin (0,0,0)
      '' we can make our life easier by assuming that the reference
      '' point is the origin of another coordinate system. Then if
      '' we make its coordinates (0,0,0) we can scale in the same
      '' fashion as before. Hmmm... which transformation can zero
      '' out the coordinates of the reference point? A translation
      '' with the negative coordinate values!!!
      ''

      dim origin: origin = array( _   '' Redundant but just for clarity...
        refpnt( VERTEX_X ) - refpnt( VERTEX_X ), _
        refpnt( VERTEX_Y ) - refpnt( VERTEX_Y ), _
        refpnt( VERTEX_Z ) - refpnt( VERTEX_Z )  _
      )

      dim moved: moved = array( _   '' Now lets move the other point too
        vertex( VERTEX_X ) - refpnt( VERTEX_X ), _
        vertex( VERTEX_Y ) - refpnt( VERTEX_Y ), _
        vertex( VERTEX_Z ) - refpnt( VERTEX_Z )  _
      )

      '' Non-uniform scaling factors
      ''
      dim scale_x: scale_x = 1.0      '' The scaling factor for x axis
      dim scale_y: scale_y = 2.0      '' The scaling factor for y axis
      dim scale_z: scale_z = 3.0      '' The scaling factor for z axis

      dim scaled: scaled = array( _   '' Scale the point as before
        moved( VERTEX_X ) * scale_x, _
        moved( VERTEX_Y ) * scale_y, _
        moved( VERTEX_Z ) * scale_z  _
      )

      '' Finally move the point back to its original coordinate
      '' system, by undoing the translation.
      ''
      dim finally: finally = array( _
        scaled( VERTEX_X ) + refpnt( VERTEX_X ), _
        scaled( VERTEX_Y ) + refpnt( VERTEX_Y ), _
        scaled( VERTEX_Z ) + refpnt( VERTEX_Z )  _
      )
While the previous example seems a little bit complicated, a little bit too much code for too little, painful and not meaningful, etc, it captures a very important geometrical idea that you might want to know even you deside to drop computation right away. The previous transformation is also known as global to local, local to global coordinate system transformation. The process conceptually is pretty simple: 1. you push down the current coordinate system by a translation to a local origin, 2. you do stuff as if you were in global coordinates and 3. you undo / pop the translation back to the original coordinate system. This method is very important if you want to implement relative motion in space. Inverse kinematics, for example, push and pop the coordinate system along points in space, which happen to belong to a skeleton-structure. Now, if this sounds complicated wait until you learn about rotation ;) On the other hand if you just wait a little bit you will find out how to suppress all these geometrical / computational paraphernalia by modularization and abstraction, that is, you will never have to write such long coordinate manipulations again.
Code and Order
Since the right part of any part of a line of code/expression is calculated first, there are some more strict rules that control what gets first evaluated and what�s next. These rules are called precedence resolution rules.
( 1 ) Expressions enclosed in parentheses are always evaluated first. More specifically if you use multiple parentheses (pairs), the most inner stuff gets calculated first and then the most outer. So, the general rule is: the computer reads/runs from inside to outside.
( 2 ) Multiplications and divisions come next.
( 3 ) Additions and subtractions follow.
      '' Examples
      ''
      dim x: x = 2 + 3 * 5               '' The result is... =  2 + 15 = 17
      dim y: y = ( 3 + 5 ) / 8           '' The result is... =  8 / 8  = 1
      dim z: z = ( -2 * 1 ) / ( 3 + 5 )  '' The result is... = -2 / 8 = -0.25
Conditional processing
The next key concept in scripting is flow control of execution / conditional processing. The general idea of decision making is simple: if this is true then do that or under these conditions the preferable action is this one. It is not that far away coding these expressions from writing in english.
      '' if then else
      ''
      if( condition_is_true )then
        '' do something
      else
        '' do something else
      end if
The most basic way for controlling a program's execution (under specific criteria) is by using the if-then-else trilogy. This applies to all programming languages.
Once an if is found during execution, the computer evaluates/calculates the value inside the parentheses.. if the result turns out to be true (remember booleans) then it "jumps in the if block" and performs the code that comes in the following lines until it reaches an else keyword or the end if keyword which means: that�s it, jump out of the if / end if and continue as usual.
Now, if the conditions turn out be false, then it skips all lines of code until an else keyword is found. Once an else is found then the computer jumps in the else / end if block and runs the lines that follow the after the else until the end if, where it jumps out. After end if everything goes as usual i.e. line by line execution. You can actually omit the else part if you don't care what happens in any other case and make a simple if-then-end if branch. So, only if the conditions are met, then something special happens. In any other case what exists between if-then and end-if will be just skipped/ignored.
      '' nesting conditionals
      ''
      if( condition_is_true )then
        if( another_condition_is_true )then
          '' do something
        end if
        '' maybe do something here too
      else
        '' do something else
      end if
You can use as many if-then-(else)s as you want, sequentially or one inside the other... (this is called branching or nesting). The crazy ritual of putting leading spaces before ifs (commonly know as indentation) helps a bit visually to follow the flow just by looking at the code. It has no other meaning but try to do it or you will be sorry.
Conditionals (themselves)
Conditional tests are like right parts of an assignment; A part of code/expression that is calculated, and in every case it must come down to a true of a false result (I mean a boolean value true or false here).
      '' conditionals
      ''
      dim x: x = 4
      dim y: y = 5

      if( x > y )then
        '' ( greater than ) it's not going to happen
      end if

      if( x < y )then
        '' ( less than ) it is going to happen
      end if

      if( x <= y )then
        '' ( less than or equal to ) it is going to happen
      end if

      if( x >= y )then
        '' ( greater than or equal to ) it is going to happen
      end if

      if( x = y )then
        '' ( equal to ) it is not going to happen
      end if

      if( x <> y )then
        '' ( not equal to ) it is not going to happen
      end if
These are the most usual conditional tests. They are actually pretty straight forward excluding the not-equal test, which might be a little bit weird (as a symbolic notation). If you want to test more than one conditions in the same time you may join tests by using the boolean operators instead of nesting if's one inside the other.
      '' boolean conditionals
      ''
      dim xmin: xmin = 0
      dim xmax: xmax = 1
      dim x: x = 0.25

      if( ( xmin < x ) and ( x < xmax ) )then
        '' true; moreover x has to be between xmin and xmax
      end if

      if( ( x < xmin ) or ( x > xmax ) )then
        '' false; moreover x has to be outside of xmin and xmax
      end if

      if( ( x > xmin ) xor ( x > xmax ) )then
        '' true; moreover x can be less than xmin but not greater than xmax
      end if

      if( not ( x > xmin ) )then
        '' false; moreover x has to be less than xmin
      end if
The tables of all truths.
|
|
|
|
Geometry 102: More on points
Lets use the conditionals for some realistic case now. First will do a point equality test, then a point approximation test and finally a point proximity test. Two points are equal only if their coordinates are equal.
      '' Point equality testing
      ''
      dim pa: pa = rhino.getpoint( "Select a point" )
      dim pb: pb = rhino.getpoint( "Select another point" )

      if( pa( VERTEX_X ) = pb( VERTEX_X ) ) then
        if( pa( VERTEX_Y ) = pb( VERTEX_Y ) ) then
          if( pa( VERTEX_Z ) = pb( VERTEX_Z ) ) then
            call msgbox( "The points are equal" )
          else
            call msgbox( "The points are not equal" )
          end if
        else
          call msgbox( "The points are not equal" )
        end if
      else
        call msgbox( "The points are not equal" )
      end if

      '' Point equality testing (compact style)
      ''
      if( ( pa( VERTEX_X ) = pb( VERTEX_X ) ) and _
          ( pa( VERTEX_Y ) = pb( VERTEX_Y ) ) and _
          ( pa( VERTEX_Z ) = pb( VERTEX_Z ) ) ) then
        call msgbox( "The points are equal" )
      else
        call msgbox( "The points are not equal" )
      end if
While this might be a reasonable testing in math, it is not always the case with computational geometry because real numbers are not very perfect: they have some precision but not absolute precision. Sometimes it is not enough to test for equality of points in this way, because there may be a fractional digit that went off, by a little bit, due to some rounding problem. You will just get a wrong result in that case (a.k.a. you have encountered a numerical stability problem). For simple geometric manipulation the coordinate to coordinate testing is enough, but for intersections for instance it is very risky to depend on simple tests. How would you do that then? You will have to rephrase the test. Instead of testing for equality "coordinate1 = coordinate2", you will first test if the difference of the coordinates is zero "coordinate2 - coordinate1 = 0". Then you will have to use a precision threshold number that is really really close the zero but not zero, say "0.00001". Then you will have to reformat the test "coordinate2 - coordinate1 <= 0.0001". Finally, in order to be safe in case the coordinates are negative numbers you will have to ensure them with an absolute value wrapping: "| coordinate2 - coordinate1 | <= 0.00001"
      '' Point equality testing
      ''
      dim pa: pa = rhino.getpoint( "Select a point" )
      dim pb: pb = rhino.getpoint( "Select another point" )
      dim zero: zero = 0.0001  '' Your almost zero tolerance

      '' Point approximate equality testing (compact style)
      '' (abs is a vbscript function that give the
      '' absolute value of a number)
      ''
      if( ( abs( pb( VERTEX_X ) - pa( VERTEX_X ) ) <= zero ) and _
          ( abs( pb( VERTEX_Y ) - pa( VERTEX_Y ) ) <= zero ) and _
          ( abs( pb( VERTEX_Z ) - pa( VERTEX_Z ) ) <= zero ) ) then
        call msgbox( "The points are pretty much equal" )
      else
        call msgbox( "The points are not equal" )
      end if
Proximity testing is actually very simple: you just test if the distance between two points is less than a proximity distance. You can also picture it as a test of a point being inside a sphere.
      '' Point proximity testing: test if pb is close enough to pa
      '' closeness is defined by the "proximity" variable
      ''
      dim pa: pa = rhino.getpoint( "Select a point" )
      dim pb: pb = rhino.getpoint( "Select another point" )
      dim distance: distance = rhino.distance( pa, pb )
      dim proximity: proximity = 5.0

      if( distance <= proximity ) then
        call msgbox( "The points are close enough" )
      else
        call msgbox( "The points are not very close" )
      end if
Iterative processing
Well, what computers are the best with, is doing the same stuff, the same way, many many times per second. Here is how: they repeat themselves. There are two kinds of loops in vbscript which are actually common in every programming language: the for/next and the do-while/loop.
The for / next loop
      ''the for / next loop
      ''
      dim control_variable
      for control_variable = initial_value to final_value
        '' the loop's body
      next
This translates to: when "the computer" sees the for keyword in the beginning of a new line of code (always in the beginning) then it assigns to the control_variable the intitial_value just like in an assignment statement. After that it jumps inside the loop's body and starts executing the lines below, running whatever exists in between for and next. When it reaches the next keyword, it suddenly jumps back to the line which contained the for everything started from, it adds one (the number 1) to the control variable and continues in the same fashion. Well, the whole thing is repeated as many times as needed in order the control variable to become equal to the final value. When this happens the program "goes out of the loop" and executes whatever code is left after the next keyword.
The rules:
( 1 ) The control variable is always a number, because in each loop it increments by one. So, if you try to give a string, guess what, the program will start crying.
      dim control_variable
      for control_variable = "A" to "Z"
        '' This wont work, at all
      next
( 2 ) You have to declare the control variable somewhere before the for loop. And of course the names selected here (control_variable, intial_value and final_value) where chosen in order to protect the witnesses (i.e. it is only an example). You can use constant numbers / literals instead of the initial and final variables but you cannot do that with the control variable.
      dim index
      for index = 0 to 100
        '' This will run for 101 times
      next
( 3 ) The control variable is just as any other variable, i.e. you can use it inside the for/next loop for doing stuff.
      dim j: j = 0
      dim i
      for i = 0 to 100
        '' This will sum (in j) the numbers between 0 and 100
        ''
        j = j + i
      next

      redim numbers( 100 )
      for i = 0 to 100
        '' This save the numbers between 0 and 100 in the array
        ''
        numbers( i ) = i
      next
( 4 ) You can even fool around with the control variable (say add stuff) but avoid doing this unless you have good evidence that this action will lead to a better world. In any other case see below for the while/loop which what you want.
      dim i
      for i = 0 to 100
        '' I wouldn't do such stuff
        ''
        i = i + 1
      next
( 5 ) As with if/then you can nest as many loops as you want; just be careful to match the for/next pair correctly. Again indentation of the code is used for quickly identifying which for pairs with which next.
      dim i
      for i = 0 to 100
        dim j
        for j = 0 to 100
          '' Keep in mind that this will run 101 * 101 = 10201 times!
        next
      next
( 6 ) Sometimes you may want to exit a for loop before it actually ends. You can do this by using the exit for command. A typical reason for exiting a loop before it ends is because some secondary condition was met, and it is not necessary to keep iterating any more.
      '' Assuming that the array "numbers" has 100 items,
      '' and we are looking for the position/index of 17
      '' if it exists...
      ''
      dim j: j = -1
      dim i
      for i = 0 to 99
        if( numbers( i ) = 17 )then
          j = i
          exit do
        end if
      next

      if( j < 0 )then
        '' j is still -1, so 17 was not detected
      else
        '' we know now that j now contains the position of 17
      end if
( 7 ) The for / next loop increments automatically the control variable by one in each loop . You can control this default behavior by using the step modifier. The step keyword allows you to define the increment of the control variable per cycle.
      ''  Loop through odds
      ''
      dim i
      for i = 1 to 100 step 2
        '' this loop will go through the even numbers i = { 1, 3, 5, ... 99 }
      next
( 8 ) You can loop backwards by setting up negative stepping and you can also step through real numbers by setting a fractional step factor.
      ''  Loop backwards
      ''
      dim i
      for i = 100 to 0 step -1
        '' some code might go here
      next

      ''  Loop through reals
      ''
      dim j
      for j = 0.0 to 1.0 step 0.1
        '' and here too
      next
The do while / until loop:
      do while( condition_is_true )
        '' process stuff
      loop

      '' alternatively

      do
        '' process stuff
      loop until( condition_becomes_false )
What's different about this kind of loop is that there are no control, initial and final variables. What controls when to stop looping here is a conditional test, just like in the if-then case. The difference with the while and until alternatives is that in the first case you check before entering the loop, while in the second case (until) the code in the loop is going to run at least once before it hits the test (and determine if there is gonna be an iteration). The do while / until loop is more general than for / next and its use is preferable when the exact amount of iterations needed is not known from the beginning. If you know or you can calculate the number of iterations needed, then try using the for / next loop which is rather more safe and stable.
The rules:
( 1 ) It is very easy to crash your computer by getting stuck in an infinite loop. Actually you might want to try this, it will be the first time that you intentionally and/or predictably you crashed it.
      do while( true )
        '' no exit situation
      loop
( 2 ) Since while is more general than for / next you can actually simulate its behavior with only a few variables.
      dim initial_value:    initial_value    = 0
      dim final_value:      final_value      = 100
      dim control_variable: control_variable = initial_value

      do while( control_variable <= final_value )
        '' just like a for / next loop
        control_variable = control_variable + 1
      loop
( 3 ) As with for / next, you can exit a do while / until loop at any time by using the exit do command. Exit do is the only way to exit a do while block if you start an infinite while( true ) loop.
      '' Weird loop but it works
      ''
      dim i: i = 0
      do while( true )
        i = i + 1
        if( i = 100 ) then
          exit do
        end if
      loop
Geometry Continued
Here are some examples of using loops from performing geometric operations.
Lets start with some basics of translating the control variable from one
domain of abstract numbers to something more meaningful. The following example
converts the control variable to angle for plotting points of a circle.
    ''  Example: Plotting points around a circle
    ''
    dim index
    for index = 0 to 36

      ''  Convert the index to degrees
      ''
      dim degrees: degrees = index * 10

      ''  Convert degrees to radians
      ''
      dim radians: radians = degrees * 3.1415 / 180.0

      ''  Calculate a point of a circle
      ''
      dim x: x = radius * cos( radians )
      dim y: y = radius * sin( radians )
      dim z: z = 0.0

      ''  Wrap the point coordinates
      ''
      dim point: point = array( x, y, z )

      ''  Pass it to rhino to draw the point
      ''
      call rhino.addpoint( point )

    next
Grids
The following example illustrates the process of making a grid of points in the xy plane
by using two nested loops and interpreting the control variables are columns and rows of
the grid, which then are translated in coordinates of the grid's points.
  '' request the number of columns and rows
  ''
  dim columns:  columns  = rhino.getinteger( "Columns" )
  dim rows:     rows     = rhino.getinteger( "Rows" )

  '' loop through columns

  ''
  dim column
  for column = 0 to columns - 1

    '' loop through rows
    ''

    dim row
    for row = 0 to rows - 1

      '' calculate (x, y) of each point based of the column and row
      ''
      dim x: x = column
      dim y: y = row

      '' create a new point on the xy plane (z = 0.0)

      ''
      dim point: point = array( x, y, 0.0 )

      '' draw the point
      ''
      call rhino.command( "-point " + rhino.pt2str( point ) )

    next

  next
NURBS
The next example plots a grid of point on a NURBS surface. But before
doing that you might want to know a little bit more about NURBS
surfaces. NURBS surfaces provide the means for creating and manipulating
curved geometry. Non Uniform Rational B-Spline surfaces are defined
by two curved directions: "u" and "v". Apart from many interesting
properties (see bibliography), NURBS surfaces make possible to draw
on them as if drawing on a plane. Instead of using ( x, y )as in
the previous example, you can use ( u, v ) and draw directly on
any surface. In order to do that; there has to be an intermediate
step of translation between the "uv" coordinates and the
"xyz" coordinates. By "evaluating" the surface at a (
u, v ) point you extract a point in ( x, y, z ) space. You may want
to think that the first example with the circle, already introduced
you to the idea of mapping from one domain to another. In a sense,
converting the control variable of a loop to angle for using it
as a parameter to functions that give you points of a circle is
not that far way from getting points of NURBS curves and surfaces.
The only difference is that you don't know the function that produces
them (but can learn more if you look on the net).
The "u" and "v" parameters of a surface have both a minimum and a maximum value. In the example with the circle the minimum and maximum values for the "angle" parameter were [0, 360] or [0, 2π]. The actual values of the minimum and maximum for NURBS are surface-specific. A pair of (min, max) is usually called domain, so a surface has two domain values (one pair per direction). Reparameterizing a surface allows you to setup the domain manually. Usually the range from 0.0 to 1.0 is preferred because it is easier to manipulate (you can think in terms of percents along a direction etc).
Have in mind that "uv" coordinates are not necessarily correlating proportionally to the "distance traveled" on a surface. In other words, the uv pair (0.5, 0.5) is not certain that it would coincide with some sort of central position on the surface. The density of the of the "uv" coordinates depends on the parameterization, knot vector and other underlying properties of the NURBS surface.
There are a couple of conceptual difficulties with NURBS which spring from its topological nature. For instance, while once you are operating on NURBS it becomes easier to encode geometry and change the underlying placeholder (which is the surface), but on the other hand there are trade offs, as for example the difficulty in thinking in terms of distances. In the circle example, for instance, the distance between two "angle" parameters is not equal to their difference but equal to the length of the arc they define.
The following example illustrates the process of creating a grid on top of a surface. The first new part of the code, outside the grid iteration, sends a command to rhino in order to reparameterize the surface. The reason for doing this is to simplify the manipulation of "uv" coordinates, so that the minimum uvs are going to be ( 0, 0 ) and the maximum ( 1, 1 ). Inside the nested loops, there is a translation part from columns and rows to u and v. The operation is fairly simple if you consider that we are mapping proportionally a "column" range of [0 to columns - 1] to a "uv" range of [0, 1]. So, the minimum "column" value, which is zero, results to zero "u" and the maximun (columns - 1) results to 1. Finally, the function "evaluatesurface" converts from a "uv" pair to a "xyz" point. In the circle example the "x = radius * cos( angle ), y = radius * sin( angle )" are the "evaluate curve" functions.
    '' Grids on NURBS
    ''
    dim columns:  columns  = rhino.getinteger( "Columns" )
    dim rows:     rows     = rhino.getinteger( "Rows" )
    dim radius:   radius   = rhino.getreal( "Radius" )

    '' request a surface
    ''
    dim surface: surface  = rhino.getobject( "Select a surface" )

    '' unselect everything and just select the surface
    ''
    call rhino.unselectallobjects( )
    call rhino.selectobject( surface )

    '' reparameterize the surface so that the u and v parameters
    '' start from 0.0 and end to 1.0
    ''
    call rhino.command( "-reparameterize 0 1 0 1" )

    dim column
    for column = 0 to columns - 1

      dim row
      for row = 0 to rows - 1

        '' calculate the uv coordinates on the surface
        ''
        dim u: u = column / ( columns - 1 )
        dim v: v =    row / ( rows    - 1 )

        '' get the (x,y,z) point from the surface (u,v)
        ''
        dim point: point = rhino.evaluatesurface( surface, array( u, v ) )

        '' draw the point
        ''
        call rhino.command( "-point "  + rhino.pt2str( point ) )

      next

    next
Procedures and Functions
The last linguistic feature presented in this page explains all about procedural thinking. Procedures and functions are means for modularization. In essence procedures are used in order to avoid rewriting the same code again and again. A good rule of the thumb in order to identify when a procedure is needed is to track when you are copying and pasting code. All this extra text could be wrapped in a function and reused in multiple places in the same or another piece of code. Procedures and functions allow you to think in terms of "actions" and by reducing the overall amount of code they make easier for you to handle more complex processes.
      '' Function template
      ''
      function name( parameter )
        '' give a value back
        name = value
      end function
( 1 ) Type the "function" keyword
( 2 ) Give a name to the function; pick the name just
as you picked names for variables
( 3 ) Use a pair of parentheses and place inside the
parameter(s) you will pass every time you want to call it.
( 4 ) Place your code that performs something afterwards
( 5 ) Use the functions's name as a variable and assign
something to it!!! This will be the returned result.
( 6 ) Type the "end function" keywords to signal that your function
is over.
Reintroduction!
You have already encountered a lot of functions built in the language, such as cstr( ), formatnumber( ) or
others provided by rhino, such as rhino.getobject( ), rhino.command( ) etc. The general syntax
for using function is:
variable = functions_name( expected_parameters )
You can also use one function inside another. In that case the rule of the parentheses apply: the most inner function is calculated first, its result is passed to the next one etc.
variable = functions_name( onther_function( expected_parameters ), maybe_more_parameters )
A function returns a value, therefore it cannot be present as the left part of an expression. It is an error.
functions_name( expected_parameters ) = value
Write your own!
Now it's time learn how to make your own functions, starting from
geometric function you already know and just didn't occur to you
that they can be wrapped around a function block in order to be
reusable and avoid the coordinate manipulation craziness.
      '' Before wrapping in a function example
      '' Lets compare which point, vb or vc, is closer to va
      ''
      dim va: va = rhino.getpoint( "Pick a point" )
      dim vb: vb = rhino.getpoint( "Pick another point" )
      dim vc: vc = rhino.getpoint( "Pick yet another point" )

      dim dx: dx = vb( VERTEX_X ) - va( VERTEX_X )
      dim dy: dy = vb( VERTEX_Y ) - va( VERTEX_Y )
      dim dz: dz = vb( VERTEX_Z ) - va( VERTEX_Z )

      dim ab: ab = sqr( dx * dx + dy * dy + dz * dz )

      dx = vc( VERTEX_X ) - va( VERTEX_X )
      dy = vc( VERTEX_Y ) - va( VERTEX_Y )
      dz = vc( VERTEX_Z ) - va( VERTEX_Z )

      dim ac: ac = sqr( dx * dx + dy * dy + dz * dz )

      if( ab > ac ) then
         call msgbox( "c is closer to a" )
      else
         call msgbox( "b is closer to a" )
      end if

      ''  After wrapping in a function example
      ''  Lets simplify it a little bit
      ''
      if( vertex_distance( va, vb ) > vertex_distance( va, vc ) ) then
         call msgbox( "c is closer to a" )
      else
         call msgbox( "b is closer to a" )
      end if

      '' Point distance
      '' expecting: two points (as arrays)
      '' expect: a number / their distance
      ''
      function vertex_distance( va, vb )
        dim dx: dx = vb( VERTEX_X ) - va( VERTEX_X )
        dim dy: dy = vb( VERTEX_Y ) - va( VERTEX_Y )
        dim dz: dz = vb( VERTEX_Z ) - va( VERTEX_Z )

        vertex_distance = sqr( dx * dx + dy * dy + dz * dz )
      end function
Subs and Functions
A procedure is a function that doesn't give back a value. You can
use the keyword "sub" (as subroutine) for signifying that you will
not return anything, but since returning stuff is not enforced by
the language (you will not get an error if you forget to return
a value from a function) you might want to use the keyword "function"
for everything. By the way, if you forget to return something from
a function, vbscript just return a vbnull value, a special value
that informs you that nothing was returned.
      '' Delete all objects
      ''
      sub delete_all( )
        call rhino.command( "selall" )
        call rhino.command( "delete" )
      end sub

      '' Totally equivalent delete all objects
      ''
      function delete_all( )
        call rhino.command( "selall" )
        call rhino.command( "delete" )
      end function
So, in other words, you can just ignore the returned value of a function. In that case you can use the keyword "call". Call just inform you / the language to ignore the returned result, or that you are calling a sub, which doesn't return anything anyway.
      '' If you take a look at rhino's documentation
      '' you will notice that the rhino.command function
      '' actually return a boolean value that informs
      '' you about the outcome of the command. Usually
      '' its unimportant so we can ignore it.
      ''
      call rhino.command( "selall" )
Bug me not!
Functions that are defined in your code, but you are not calling them from anywhere are simply
ignored by the language. Thus you cannot know if there are errors in them or if they work at all.
Scope: The life and death of variables
Variables defined inside the body of a function (with the dim keyword) are unusable outside the function. That means that they
live only inside the function. If you define an array with the redim keyword, then it will be dead by the
time the code hits the end function / end sub keyword. In that sense you cannot return an array made with
redim from within a function, but you can do that if you make an array using the array function! All these
regulations are also known as code scope.
Another thing you might want to know about code scope is that you can actually use a variable that was defined outside a function from within the function (but not belonging to another function's body). This is not very safe this thing to do though. For example the VERTEX_X variable was defined outside the function vertex_distance( ), but we were able to use it inside. These variables, that are defined outside of all functions, are also known as global variables because you can access them from everywhere. While it is safe to read their value, it is not very wise or safe to modify them.
      '' Example of scope
      ''
      function scope_example( )

        '' All variables are not accessible outside the function
        ''
        dim x: x = 0
        redim arr( 128 )
        dim v: v = array( 0, 0, 0 )

        '' The value can be passed back
        '' all numbers and strings
        ''
        scope_example = x

        '' The value cannot be passed back!!!
        '' weird but true: the array was allocated locally
        ''
        scope_example = arr

        '' The value can be passed back
        '' weird but true: the array was allocated globally
        ''
        scope_example = v

      end function
In the shadow of another variable.
You can define a variable with the same name with a global variable
inside a function. In that case there will be a problem of resolution.
For these cases the rule of shadowing applies: the variable in scope
has a priority, therefore the outer variable is inaccessible, thus
shadowed by the inner one.
      '' Global variable x
      ''
      dim x: x = 0

      '' Example of shadows
      ''
      function shadows( )

        dim x: x = 0
        x = x + 1  '' q: which x is actually modified??? a: the x inside the function

      end function
Functions are not nestable!
While this is possible in some languages, in vbscript you cannot nest functions in the same way
that you nest conditionals and loops. All functions much be in the same global level of code. On the
other hand as you have noticed by now, you can nest function calls.
      '' EXAMPLE ERROR, DON'T DO IT
      ''
      function outter_function( )

        function inner_function( )


        end function

      end function


      '' Nesting function calls is perfectly valid
      ''
      dim x: x = cos( sqr( abs( -1.0 ) )
Parameter craziness.
There are some weird rules concerning the parameters you pass to
a function. There are actually two ways to pass parameters in all
programming languages. The first one is called passing by value,
which means that whenever you calling a function the parameters
you are passing are copied in memory and their value is stored in
the parameters. This means that if you change the value of the parameters
inside a function the values that you passed in the function are
not affected, because you are actually playing with copies of variable
values. The other way of passing parameters is also known as passing
by reference or pointer. In this case, you are actually passing
real variables with their values. This implies that the parameters
are aliases of the variables you passed when you called the function.
Moreover, if you change a parameters' value inside a function, that
will affect the value of the variable you passed to the function.
So, even though this concept may not be extra clear to you right
now, try to avoid changing the values of your parameters because
vbscript uses this later weird convention which sometimes tends
to be unsafe.
THE END